 Thanks to Jo Ann (Nanascraps), who advised she was always getting a black filled layer, there was a missing piece to my tut. It dawned on me today that step 6 was missing the select Path to Selection piece of info. Sorry everyone, I'm doing my steps in auto pilot mode. So will update the tut in the next post too so that all is in order (hopefully). Remember all comments welcome.
Showing posts with label GIMP 2.6.0 Tutorial. Show all posts
Showing posts with label GIMP 2.6.0 Tutorial. Show all posts
Tuesday, April 20, 2010
Update to GIMP Tut: Text along Path
Thanks to Jo Ann (Nanascraps), who advised she was always getting a black filled layer, there was a missing piece to my tut. It dawned on me today that step 6 was missing the select Path to Selection piece of info. Sorry everyone, I'm doing my steps in auto pilot mode. So will update the tut in the next post too so that all is in order (hopefully). Remember all comments welcome.


Tuesday, April 13, 2010
GIMP Tut: Text along Path
It is finally here, a tutorial on how to create text along a path.

Lets start and hopefully I won't loose you.
Note: Click the image to enlarge and see more detail.


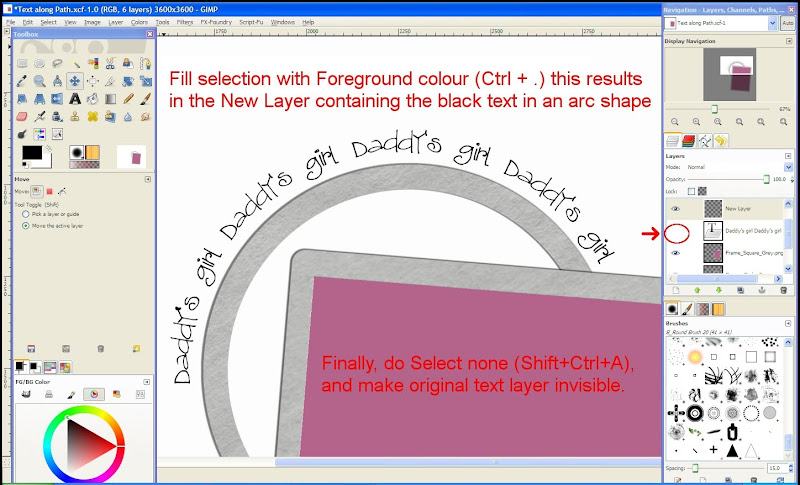
Now these steps should also work for any other shape you come across, let me know how you get on.

Lets start and hopefully I won't loose you.
Note: Click the image to enlarge and see more detail.


Now these steps should also work for any other shape you come across, let me know how you get on.
Tuesday, December 15, 2009
GIMP Tut: Changing element's colour using Colorize Tool
 How often have got a kit but you found a certain element is not the colour you are after? Well, it's just so easy changing any element's colour in GIMP and I will show you here in just a few steps.
Some simple instructions as follows:
1. With element's layer selected, select the Colize Tool from the Colors menu
2. Click and drag the Hue slider until you have changed the element's colour to your liking.
In my example the Hue was changed to 280 to achieve a nice purple element.
3. Click OK to make the colour change permanent.
That's all, nice & easy wasn't it!
Hopefully the following screenshots are easy to follow in using this colorize feature. Let me know how you find it if you like.
TIP - Click on each screenshot for closeup.


It really is that easy. Now you have no excuse for not using any element because it's the wrong colour!
Monday, August 24, 2009
Easy Photo Border In GIMP

I hadn't noticed this menu option before until I worked on my recent layout and played with it. It's called "Border" and you'll find it under the "Grow" option on the Select menu.
Some simple instructions as follows:
1. Select photo layer, do Alpha to Selection,
2. Create new transparent layer,
3. Ensure that new layer is selected now, go to Select menu > Border, In pop-up window set border size to your liking,
4. Edit menu > Fill with BG color (default is set to white),
5. Add dropshadow layer if you wish and you are done.
Hopefully the following screenshots are easy to follow in using this border feature. Let me know how you find it if you like, I sure found it useful.
TIP - Click on each screenshot for closeup.


Thursday, July 2, 2009
In Perspective using GIMP - mini Tut
Got asked by Mel how to use this wonderful tool I've just discovered, so thought to help everyone out by publishing this mini tut.
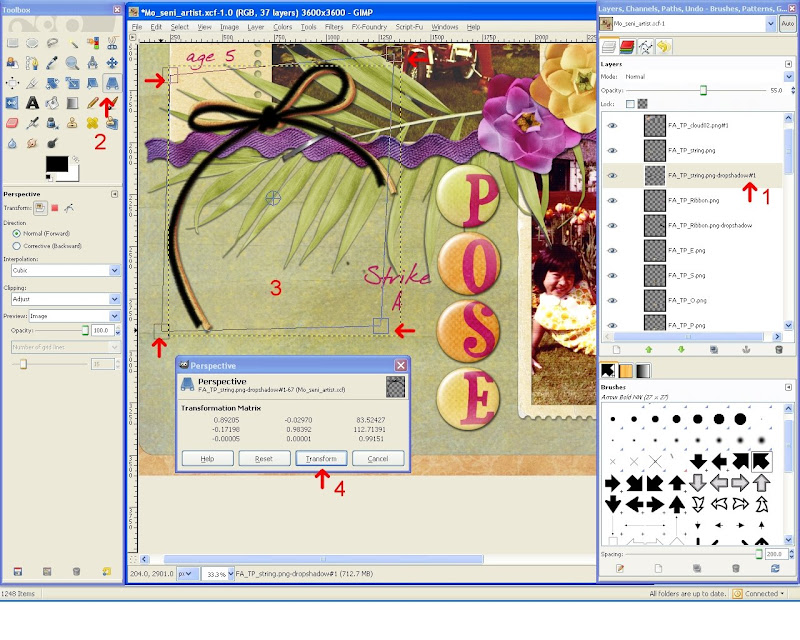 HOW TO USE THE PERSPECTIVE TOOL
1. Ensure you have the element and dropshadow in seperate layers and select the dropshadow layer.
2. Select Perspective Tool (Shift+P)
3. Click and drag the corner handles to your liking.
4. When you are happy, select Transform from window.
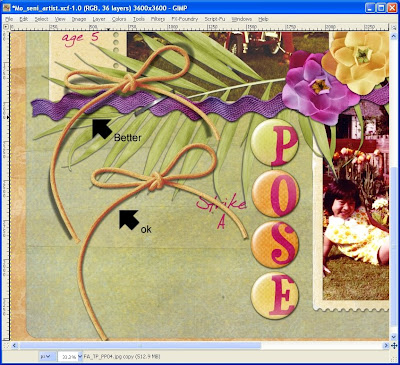
And how do you find the result???
 HOW TO USE THE PERSPECTIVE TOOL
1. Ensure you have the element and dropshadow in seperate layers and select the dropshadow layer.
2. Select Perspective Tool (Shift+P)
3. Click and drag the corner handles to your liking.
4. When you are happy, select Transform from window.
And how do you find the result???

Monday, June 29, 2009
My new found (GIMP) friend

I have a new GIMP best friend, called the Perspective tool (Shift+P) and have used it here on the string & ribbon element shadows to give more realistic shadow and just love the effect. To achieve these, ensure you create the shadow in a separate layer. Then using the Perspective tool on the shadow layer and pull the corners to you liking to mimic a more realistic drop shadow on those ribbon/bow like elements. Once you get the hang of this, you'll find that your elements don't look so flat anymore. Have some fun and give it a GO!
Another layout completed for my birthday album, all will be revealed soon...
Credit: Artist kit by Seni
Monday, April 20, 2009
Happy feet...
Well things are good, I still have a job and we are still in our own home and I'm blessed with having loving boyz.
Have not been scrapping much of late, still busy as ever with our business stuff, squash and work, though did take last week of and ended up learning heaps about the accounting package we are using, but all good. So just managed only to finish my monthly CT requirements so far and scrapped some penguin photos from Charles & Kelly's recent Antartic trip, the lucky things!

Credits: Dancing with Wales kit & photo mask available at ScrapbooksGoneDigital
Have not been scrapping much of late, still busy as ever with our business stuff, squash and work, though did take last week of and ended up learning heaps about the accounting package we are using, but all good. So just managed only to finish my monthly CT requirements so far and scrapped some penguin photos from Charles & Kelly's recent Antartic trip, the lucky things!

Credits: Dancing with Wales kit & photo mask available at ScrapbooksGoneDigital
Wednesday, November 26, 2008
GIMP Digiscrapping Tutorial - "Installing fonts for use in GIMP"
I got asked this question by Cat not so long ago, which she managed to follow no problems. So thought to might as well share it with you GIMPsters out there if you wondered how.
1) First download, unzip, install font to C:\Windows\Fonts - refer to Dafont-faq for more instructions.
2) If GIMP is already open, exit GIMP and re-open OR with Text Tool selected, click on Font selection icon,
click on Open the font selection dialog (bottom right button),
click Rescan font list (looks like arrows pointing at each other at bottom of dialog).
The rescan may take a while, so be patient.
3) With Text Tool selected, click on canvas or new layer and type away with your newly installed font.
That's all folks.
Monday, October 20, 2008
GIMP Digiscrapping Tutorial - "Creating a Sticker WordArt in Gimp"
Are you ready to give this next tut a go? Well, this is my version of creating a simple WordArt anyway...

Create a text layer for each WordArt line.
In this example I have "Cherish" & "every moment" using 2 layers and different font for each.
Select Elliptical select Tool (E) and with "Cherish" text layer selected, create an elliptical selection larger than "Cherish" text.
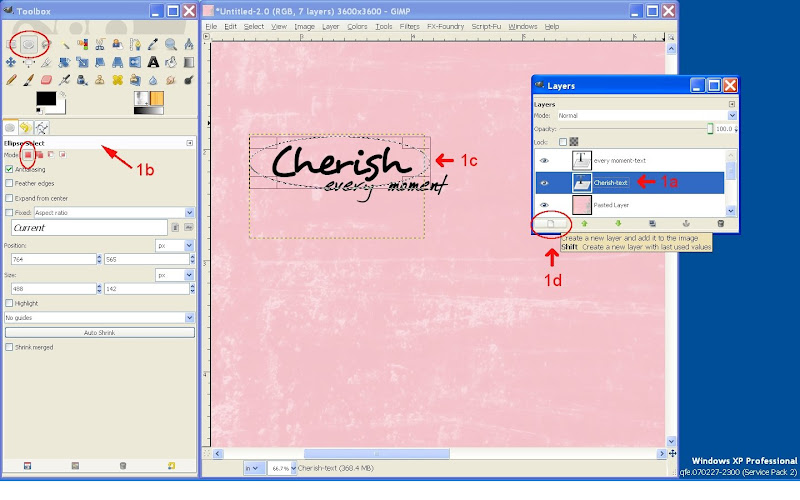
Create New Transparent layer below "Cherish" text layer, and fill with White Background colour.
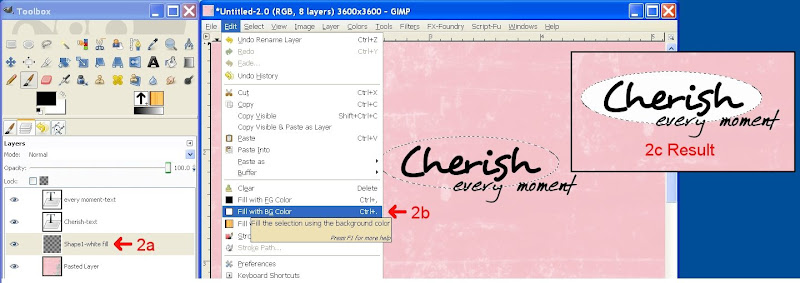
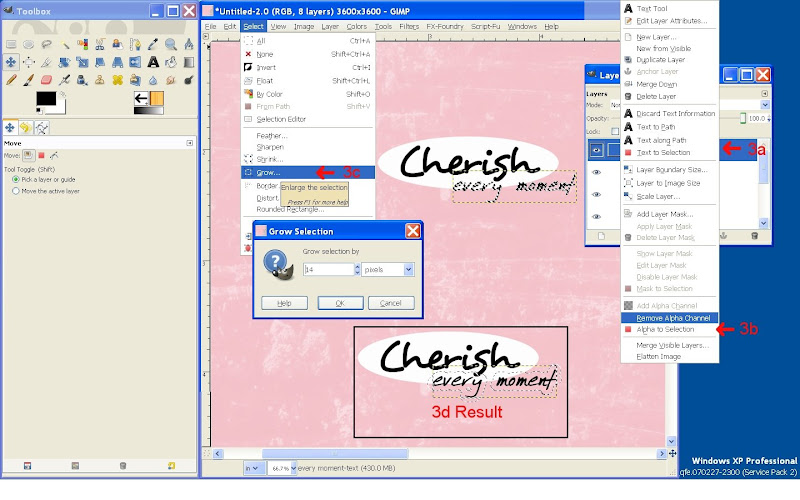
Select "every moment" text layer, do Alpha to Selection, Select > Grow & grow selection by 14 px.
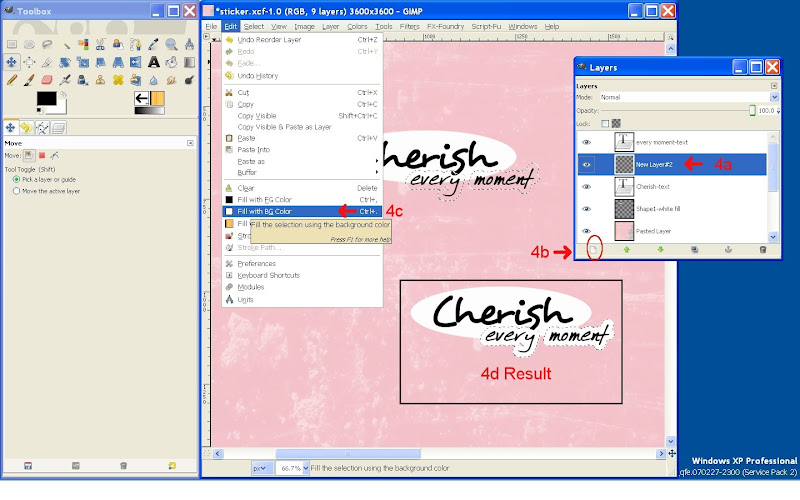
Create New Transparent layer below "every moment" text layer, and fill with White Background colour (Ctrl+.).
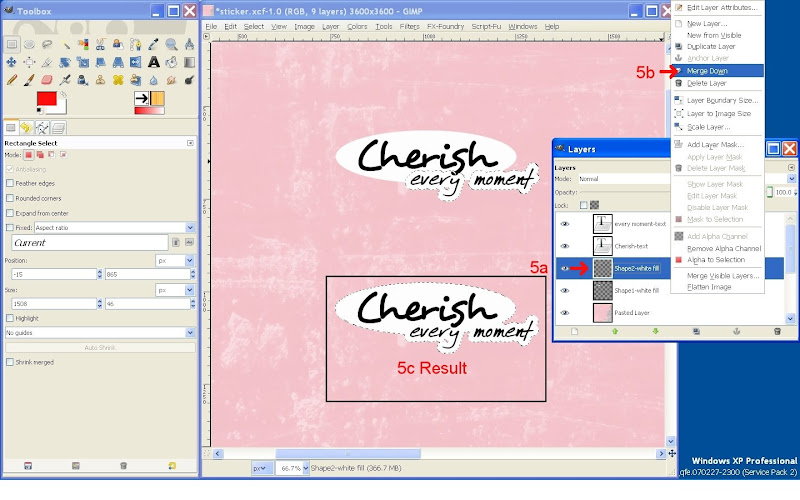
Now move your 2 newly created white filled layers together below the text layers and Merge down together.
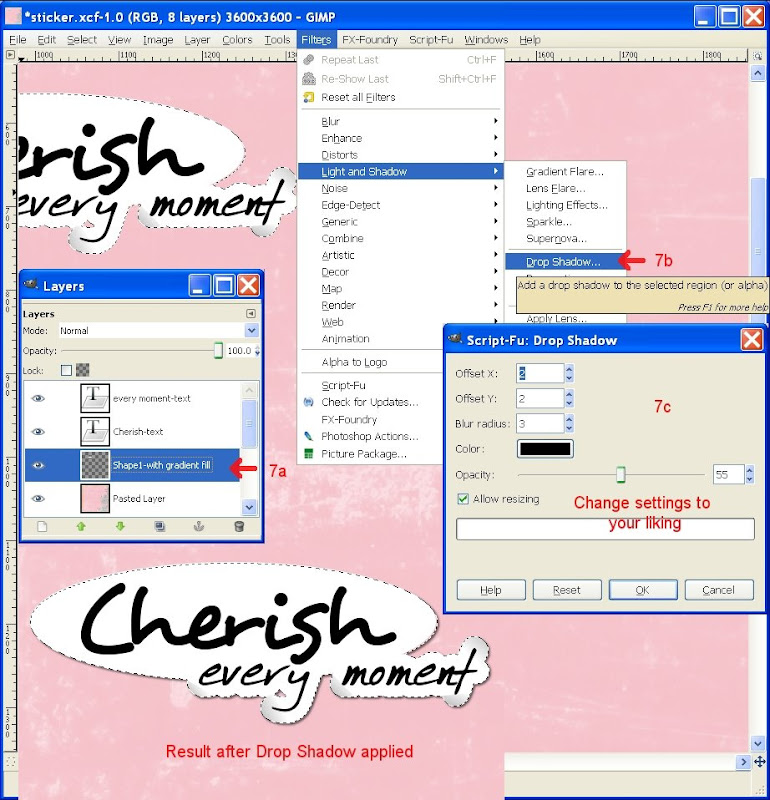
Finish by applying layer shadow.

Create a text layer for each WordArt line.
In this example I have "Cherish" & "every moment" using 2 layers and different font for each.
Select Elliptical select Tool (E) and with "Cherish" text layer selected, create an elliptical selection larger than "Cherish" text.

Create New Transparent layer below "Cherish" text layer, and fill with White Background colour.

Select "every moment" text layer, do Alpha to Selection, Select > Grow & grow selection by 14 px.

Create New Transparent layer below "every moment" text layer, and fill with White Background colour (Ctrl+.).

Now move your 2 newly created white filled layers together below the text layers and Merge down together.

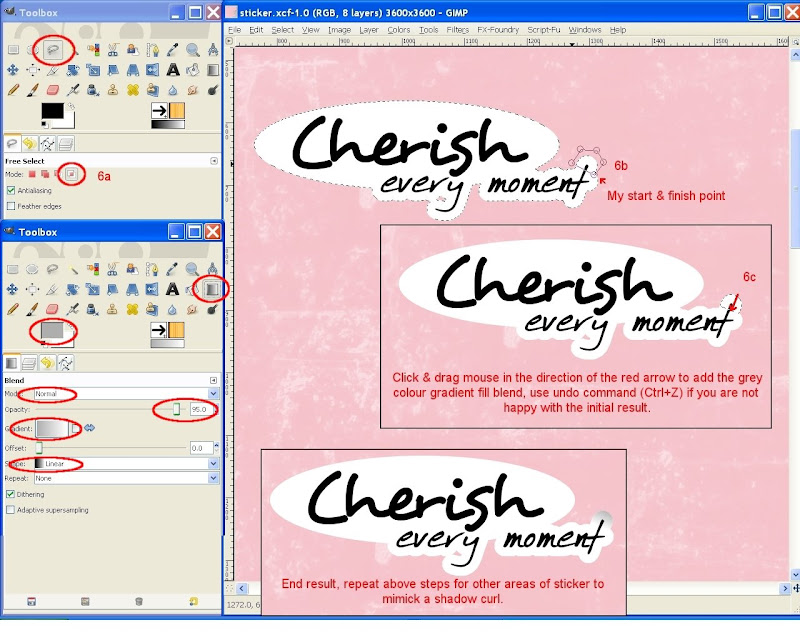
We will now try and create a slight sticker lifting/curling using the Gradient tool to mimick shadowing.
- Select last merged layer, do Alpha to Selection, select Free Select Tool (F) with Intersect Mode selected, and click selection points around the area where you want to have your gradient shadow & finish by clicking your first selection point to end the selection.
- With Blend Tool selected (L), this will fill your selection with a gradient colour, pick a grey Foreground colour, Blend Mode = Normal, Opacity to your liking, Gradient set to FG to BG, shape = Linear.
- Click & drag your mouse at an angle where you want the curling shadow to go from grey to white.

Finish by applying layer shadow.
 |
| From In my Digi GIMP world |
Thursday, October 9, 2008
GIMP Digiscrapping Tutorial - "Lets Grunge some Title Text in Gimp"
There are endless amount of grunge brushes available, just do a google search on "Photoshop free grunge brushes", use the following site http://hawksmont.com/blog/gimp-how-to-add-brushes/ to help you with installing/adding Photoshop/GIMP brushes in GIMP. It has been a lifesaver for me in the past.
So here we go, this is what my tutorial is all about... Please leave a comment to let me know what you think.

Type your title in a wide font, I choose Braggadocio.
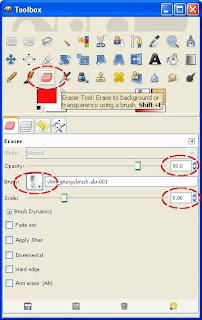
Select Eraser tool, from Brush selector pick a grungy type brush, set Opacity <= 80, Set Scale to a size so that the brush you use looks smaller than the font.
Ensure your title layer is selected, click & drag your mouse over the text and see the title getting 'grunged'.
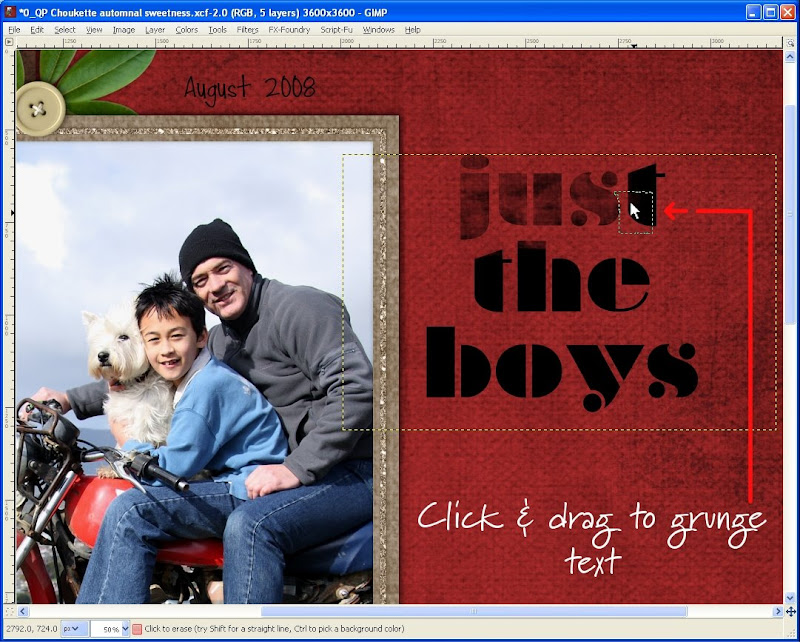
Continue erasing/grunging all letters of your title.
Change your Foreground colour of your choice, select Alpha to Selection, and fill with ForeGround colour (Ctrl+,), Select None (Shift+Ctrl+A).
And you are done.
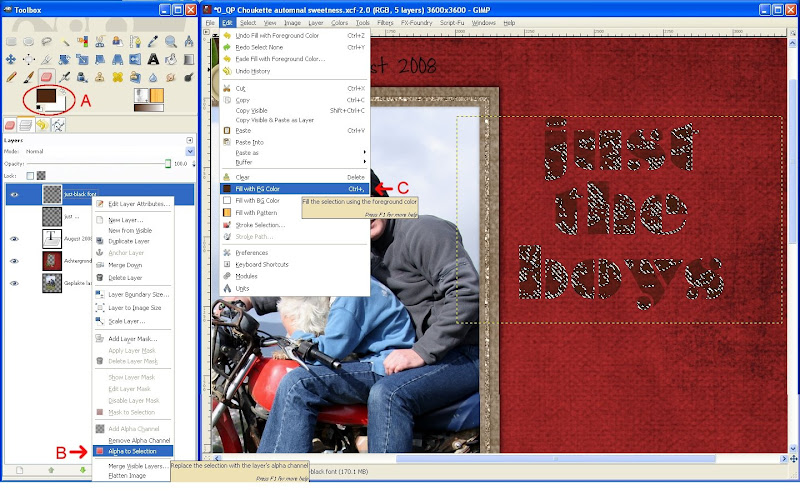
Credits: Automnal Sweetness QP by Choukette
So here we go, this is what my tutorial is all about... Please leave a comment to let me know what you think.

Type your title in a wide font, I choose Braggadocio.
Select Eraser tool, from Brush selector pick a grungy type brush, set Opacity <= 80, Set Scale to a size so that the brush you use looks smaller than the font.

Ensure your title layer is selected, click & drag your mouse over the text and see the title getting 'grunged'.

Continue erasing/grunging all letters of your title.
Change your Foreground colour of your choice, select Alpha to Selection, and fill with ForeGround colour (Ctrl+,), Select None (Shift+Ctrl+A).
And you are done.

Credits: Automnal Sweetness QP by Choukette
Subscribe to:
Posts (Atom)


 Posts
Posts


