 Thanks to Jo Ann (Nanascraps), who advised she was always getting a black filled layer, there was a missing piece to my tut. It dawned on me today that step 6 was missing the select Path to Selection piece of info. Sorry everyone, I'm doing my steps in auto pilot mode. So will update the tut in the next post too so that all is in order (hopefully). Remember all comments welcome.
Showing posts with label tutorials. Show all posts
Showing posts with label tutorials. Show all posts
Tuesday, April 20, 2010
Update to GIMP Tut: Text along Path
Thanks to Jo Ann (Nanascraps), who advised she was always getting a black filled layer, there was a missing piece to my tut. It dawned on me today that step 6 was missing the select Path to Selection piece of info. Sorry everyone, I'm doing my steps in auto pilot mode. So will update the tut in the next post too so that all is in order (hopefully). Remember all comments welcome.


Tuesday, April 13, 2010
GIMP Tut: Text along Path
It is finally here, a tutorial on how to create text along a path.

Lets start and hopefully I won't loose you.
Note: Click the image to enlarge and see more detail.


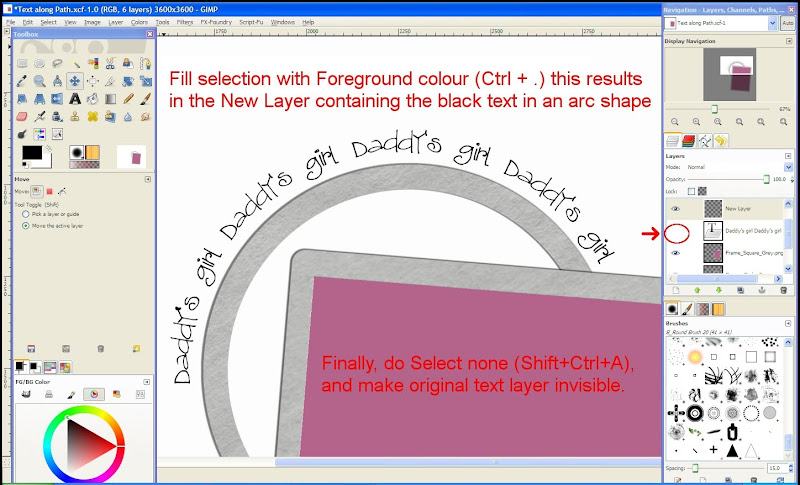
Now these steps should also work for any other shape you come across, let me know how you get on.

Lets start and hopefully I won't loose you.
Note: Click the image to enlarge and see more detail.


Now these steps should also work for any other shape you come across, let me know how you get on.
Monday, August 24, 2009
Easy Photo Border In GIMP

I hadn't noticed this menu option before until I worked on my recent layout and played with it. It's called "Border" and you'll find it under the "Grow" option on the Select menu.
Some simple instructions as follows:
1. Select photo layer, do Alpha to Selection,
2. Create new transparent layer,
3. Ensure that new layer is selected now, go to Select menu > Border, In pop-up window set border size to your liking,
4. Edit menu > Fill with BG color (default is set to white),
5. Add dropshadow layer if you wish and you are done.
Hopefully the following screenshots are easy to follow in using this border feature. Let me know how you find it if you like, I sure found it useful.
TIP - Click on each screenshot for closeup.


Thursday, July 2, 2009
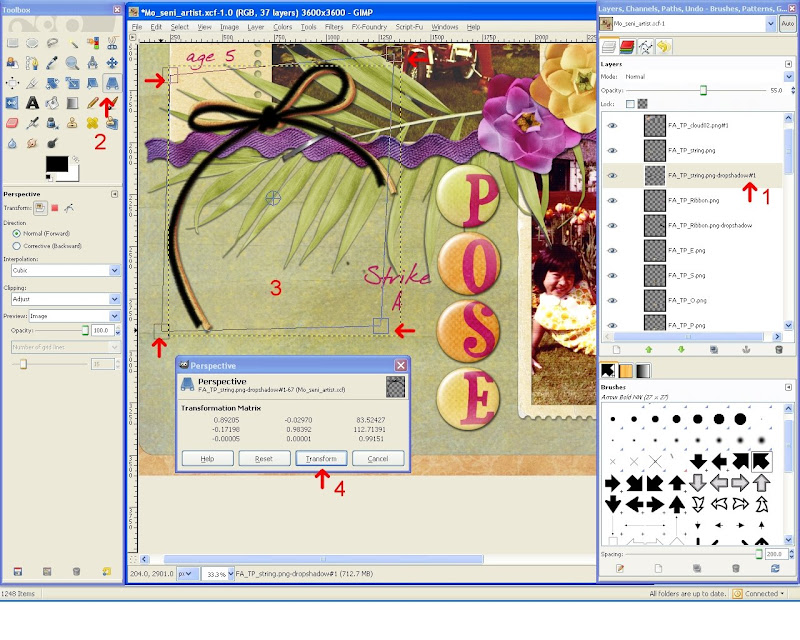
In Perspective using GIMP - mini Tut
Got asked by Mel how to use this wonderful tool I've just discovered, so thought to help everyone out by publishing this mini tut.
 HOW TO USE THE PERSPECTIVE TOOL
1. Ensure you have the element and dropshadow in seperate layers and select the dropshadow layer.
2. Select Perspective Tool (Shift+P)
3. Click and drag the corner handles to your liking.
4. When you are happy, select Transform from window.
And how do you find the result???
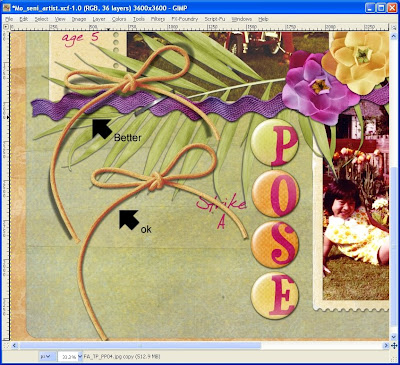
 HOW TO USE THE PERSPECTIVE TOOL
1. Ensure you have the element and dropshadow in seperate layers and select the dropshadow layer.
2. Select Perspective Tool (Shift+P)
3. Click and drag the corner handles to your liking.
4. When you are happy, select Transform from window.
And how do you find the result???

Sunday, May 25, 2008
Have I got my cousin hooked on GIMP yet?


I wonder if I have Conny hooked yet. Got an email from her during the week wanting some help, so I pointed her to this site http://www.scrapbooksgonedigital.com/TUTORIALS/. This hopefully will have everything to get her started. Remember Conny, start with the basics and make small baby steps. I remember using this site in the past when I first started out with my GIMP, and it sure helps having those step by step instructions & videos.
It has been cold weather this weekend, so a good excuse to get more pages finished. These being from Colin's 9th birthday in 2005. I don't participate in Halloween as not a New Zealand tradition, but since Colin celebrates his birthday in October it sure was a good excuse to have a theme party and Colin's mates still remember the fun times had.
Credits LO1: Crazy Garden Alpha by babs, Template by Simply Yin, paper from Macabre kit by Jan Crowley at www.oscraps.com
Credits LO2: Scrap Orchard So You Think You Can Design week 3 template by Janel Scraps, paper from Macabre kit by Jan Crowley at www.oscraps.com
Subscribe to:
Posts (Atom)


 Posts
Posts


