Friday, October 31, 2008

Happy Halloween to y'all!


Not too much of a big thing here in NZ, but if Steve & Jade were here I'm sure we'd have a big party like last year. Speaking of the happy couple they are now back in San Diego for their wedding on Halloween, good luck you guys - have a HaUnTiNgLy good time!


So in keeping with the Halloween theme, here is my 1st CT layout for SgD using current products available at ScrapbooksGoneDigital.

This layout was created using the following SgD Club Products:
SgD Photoshop Layer Template # T0026 SgD Halloween Elements SgD Halloween Overlay

Monday, October 27, 2008

I'm on the SgD Creative Team

Photobucket Photobucket

How exciting is this, I applied and got accepted to a CT call at ScrapbooksGoneDigital! I'm really enjoying this community as they are so GIMP friendly, so it was only natural to sign up there. It's early days so am already having my thinking cap on for my monthly requirements, so watch this space.

It's Labour Day here in NZ, but my poor hubby was out working till late afternoon. So had a nice day out with CJ visiting my Mum. Hope you had a fab day yourselves too.

Saturday, October 25, 2008

CJs birthday photos finally GIMPed


Another week has passed since CJs birthday and I finally got around to scrapping these surprise photos of him. He's not to happy about them, but as I pointed out, the focus of the lo is not on his surprise faces - though the expression is priceless! As a SgD deadline was looming (today) and I had expressed an interest, I killed 2 birdies & scrapped the photos for the challenge. I feel like I'm loosing my digiscrap mojo, things are slowly moving in my hubby's new business and I am helping him out a lot. So only leaves stolen moments here and there, like right now in bed with laptop on my lap ;)

Credits:
KHartley StinkerGreen Alpha (recoloured), Coralee Evans Wild button, Nicolina GonnaBeARockStar papers, LDD VintageRetroDreams paper

Monday, October 20, 2008

GIMP Digiscrapping Tutorial - "Creating a Sticker WordArt in Gimp"

Are you ready to give this next tut a go? Well, this is my version of creating a simple WordArt anyway...

Photobucket

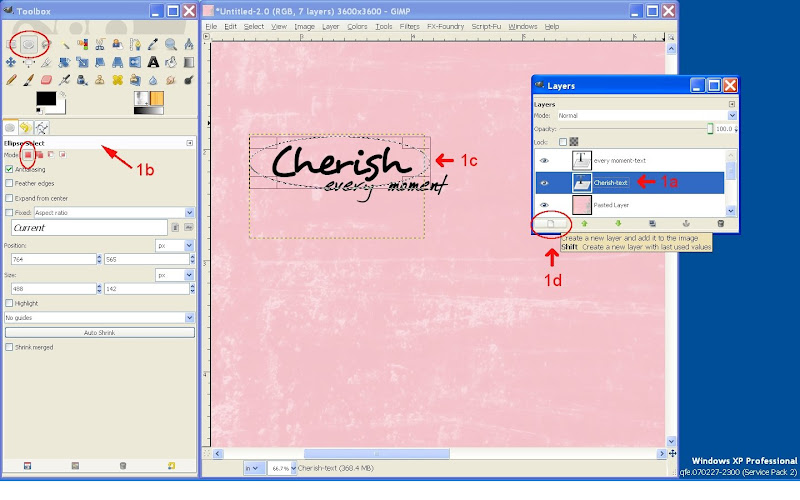
Create a text layer for each WordArt line.
In this example I have "Cherish" & "every moment" using 2 layers and different font for each.
Select Elliptical select Tool (E) and with "Cherish" text layer selected, create an elliptical selection larger than "Cherish" text.


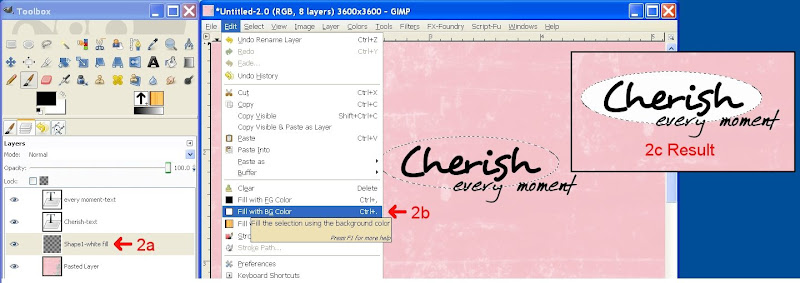
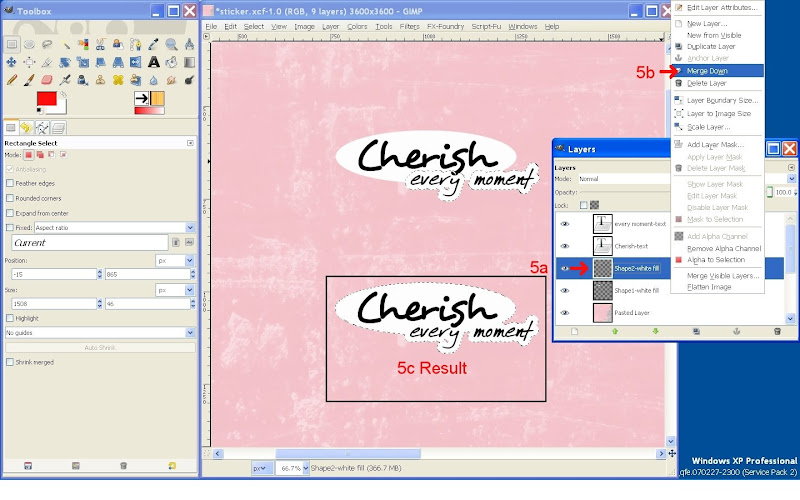
Create New Transparent layer below "Cherish" text layer, and fill with White Background colour.


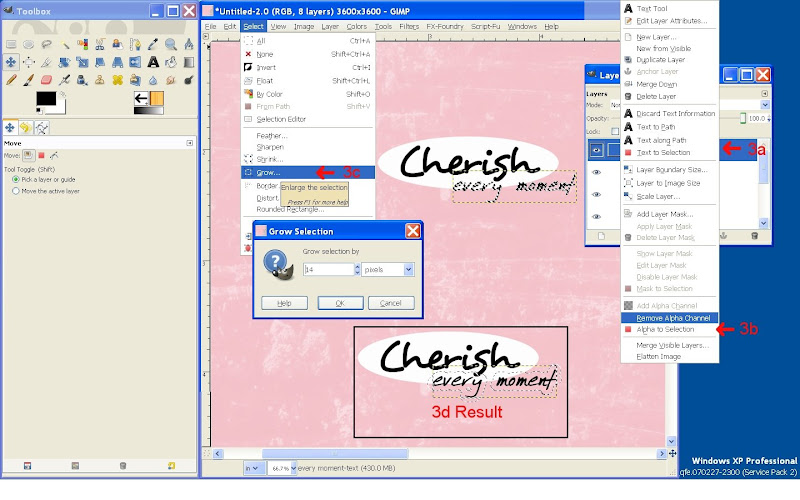
Select "every moment" text layer, do Alpha to Selection, Select > Grow & grow selection by 14 px.


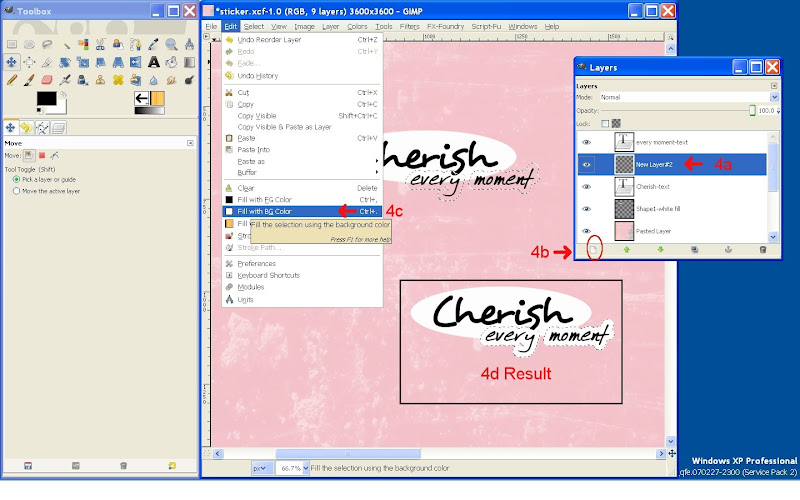
Create New Transparent layer below "every moment" text layer, and fill with White Background colour (Ctrl+.).


Now move your 2 newly created white filled layers together below the text layers and Merge down together.


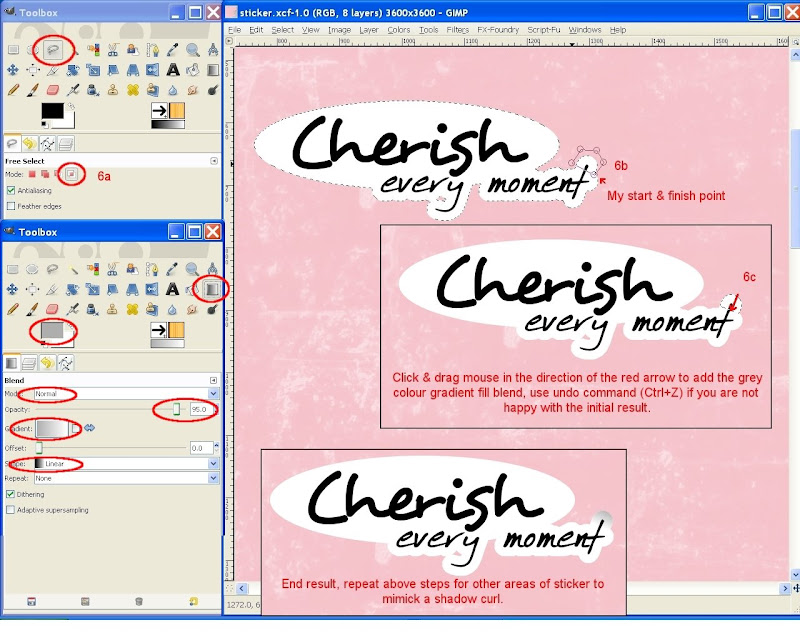
We will now try and create a slight sticker lifting/curling using the Gradient tool to mimick shadowing.

  • Select last merged layer, do Alpha to Selection, select Free Select Tool (F) with Intersect Mode selected, and click selection points around the area where you want to have your gradient shadow & finish by clicking your first selection point to end the selection.
  • With Blend Tool selected (L), this will fill your selection with a gradient colour, pick a grey Foreground colour, Blend Mode = Normal, Opacity to your liking, Gradient set to FG to BG, shape = Linear.
  • Click & drag your mouse at an angle where you want the curling shadow to go from grey to white.
Repeat above bullet point instructions where curling shadow is required.


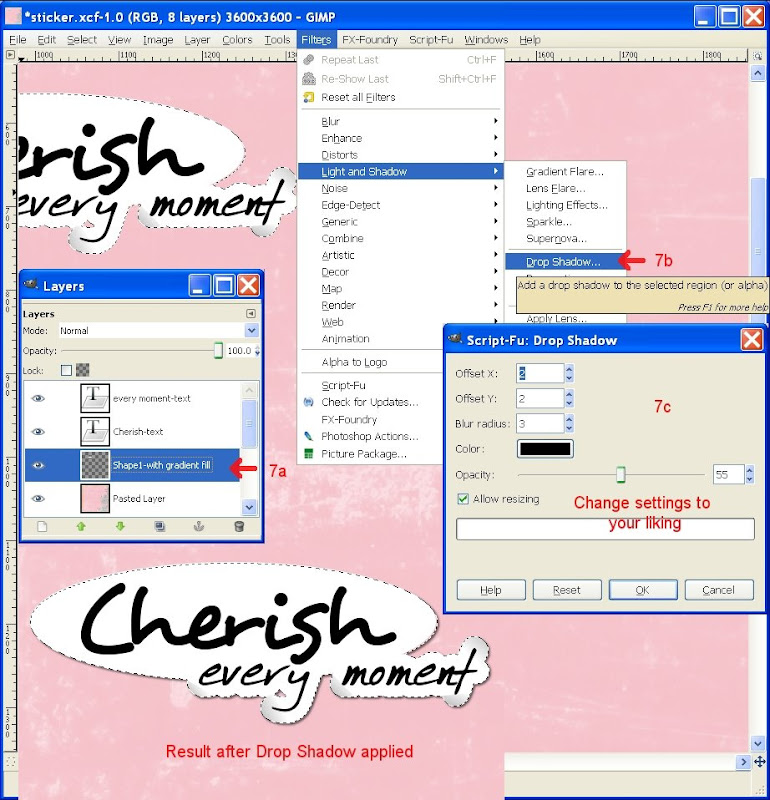
Finish by applying layer shadow.
From In my Digi GIMP world

Thursday, October 16, 2008

Happy 12th birthday CJ


Oh the surprise on your face was priceless yesterday after school when you received your presents a day earlier. Well, there was no point in leaving it till Thursday with early morning school routine and you going to your Dad's in the evening. We hid your present at Lynn's these last few weeks after BB spotted this bike for you for sale. Your Dad and grandparents got your helmet and with the 2 dirt bikes now you guys can ride together. We quized you later what you thought you were getting for your birthday and said a trampoline as BB had mowed the lawns in Corey's area, so it was great to see you had no idea at all that a dirt bike was coming. A quick change later & BB showed you the ropes across the road from us and away you went. You handled the bike very well and stayed on when you did your 1st wheelie and managed to stay on! Not the case when later you picked up too much speed going up hill and not keeping your weight forward, but you did the right thing and jumped clear of the bike. As BB put it, these bikes are made for off road and spills! Your cousin Hamish dropped by on way home from school as he spotted us along the road. He too has a dirt bike so I can only imagine the fun you'll have together later on when you get better.

Won't be long now when you get the hang of the clutch and can kick start the bike yourself, well there is always the weekend now for practising...

Monday, October 13, 2008

Piñata dramas

I finally got started on CJ's birthday piñata on my day off on Friday. The day started of well with CJ & I of early to the shops to buy the goodies. Several shops later, we made it home to start a productive afternoon. CJ picked a big smiley face as the theme while searching numerous images until he spotted the perfect looking face, then he set off to blow me the balloon while I got onto making the flour paste. That was until I said to blow it bigger due to small size & then it popped! Darn cheap crap, turned out to be small balloons. So had to dash of to the shops again for better ones, grumble - grumble….

Got back, this time with helium quality big balloons and with DS's help the paper mache-ing finally started mid-afternoon. From memory, I think we got 2 layers done that day.

Saturday proofed to be such a stunner of a day, got another layer done before BB and I went of to the Hutt to pick up free tickets to 'Abba Mania' from sister in-law's place and yummy curry lunch while out. We got back and I applied layer 4 and thought to speed up the process, would leave the piñata in the car to dry out while it was parked in the sun. I toddled of to help BB with the grass clippings, checked 2 times for dryness and thought to leave it a little bit longer. 10 Minutes passed and I checked up on piñata, by which time it had badly EXPLODED with 3 major rips. I could have cried! In the heat of the car, the balloon under the multiple layers had expanded until the paper mache could no longer resist the pressure. GREAT! Don't really have time to start all over again, so did the last choc & lollies shop, filled the badly ripped piñata with all the goodies and taped up as best as I could the rips and continued paper mache-ing. It doesn't look to bad now. A few more layers and I'll be finished, ready for painting. What a drama...


Thursday, October 9, 2008

GIMP Digiscrapping Tutorial - "Lets Grunge some Title Text in Gimp"

There are endless amount of grunge brushes available, just do a google search on "Photoshop free grunge brushes", use the following site http://hawksmont.com/blog/gimp-how-to-add-brushes/ to help you with installing/adding Photoshop/GIMP brushes in GIMP. It has been a lifesaver for me in the past.

So here we go, this is what my tutorial is all about... Please leave a comment to let me know what you think.

grunge-med

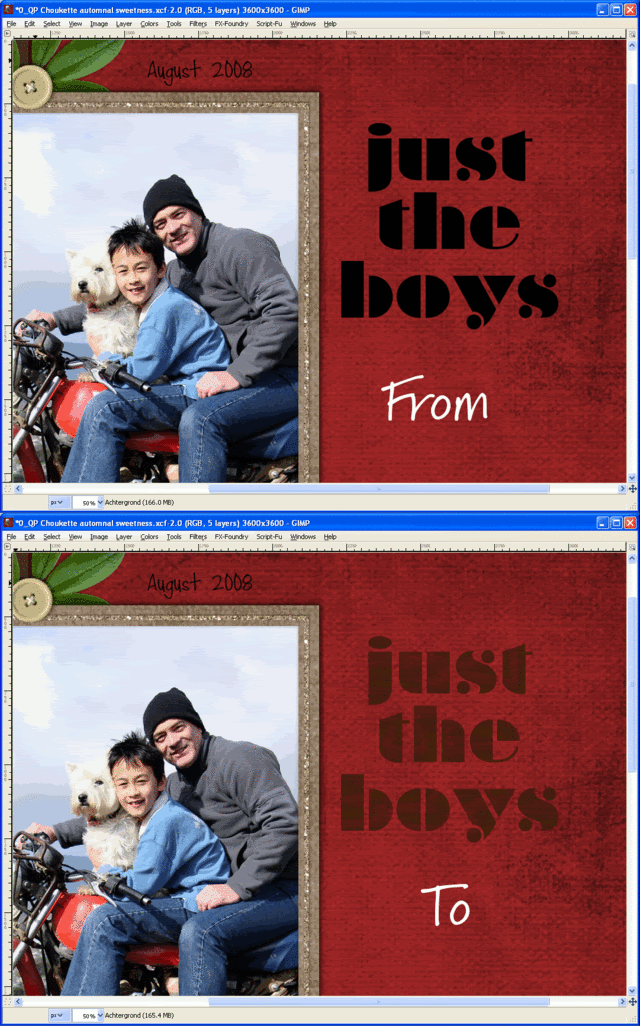
Type your title in a wide font, I choose Braggadocio.
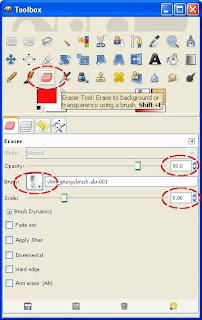
Select Eraser tool, from Brush selector pick a grungy type brush, set Opacity <= 80, Set Scale to a size so that the brush you use looks smaller than the font.


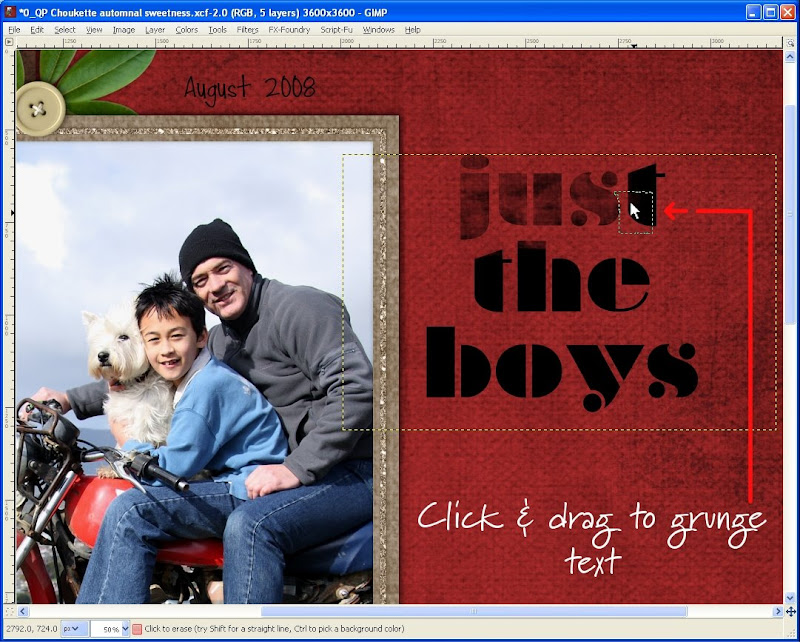
Ensure your title layer is selected, click & drag your mouse over the text and see the title getting 'grunged'.


Continue erasing/grunging all letters of your title.

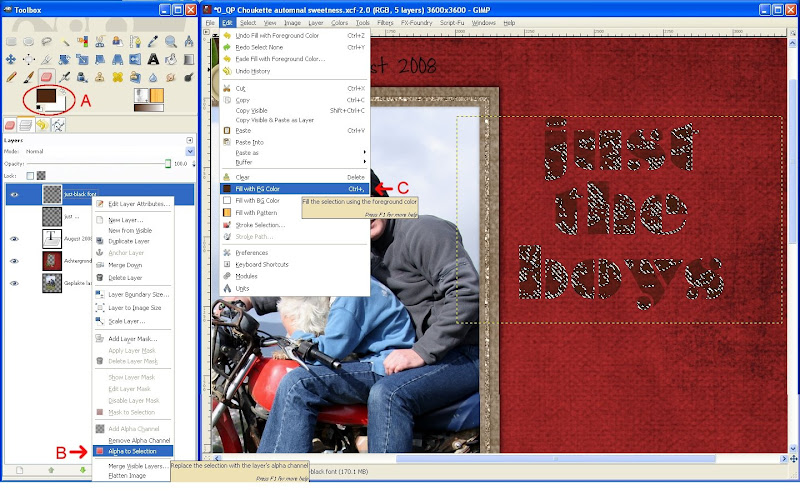
Change your Foreground colour of your choice, select Alpha to Selection, and fill with ForeGround colour (Ctrl+,), Select None (Shift+Ctrl+A).
And you are done.


Credits: Automnal Sweetness QP by Choukette

Wednesday, October 8, 2008

GIMP 2.6.0 is Here!


Yip, am late back from squash & too hyped up to find my pillow. We had a home game and I had a good win. Brian reckons I am too serious on court, that might be so but if I concentrate and block everything out I tend to do much better. That might come across as serious, I just leave the socializing till afterwards. It was a 2-2 draw, team Northern just won by a winning game, never mind girls - still a good effort.

Found out a couple of days ago that there was a new version out of gimp. So thought to bite the bullet and go all the way from 2.4.2 to 2.6.0 and it has been smooth sailing so far. Have had no probs with installing my old brushes and it looks it still recognizes my stash of scripts, so fingers crossed I took the leap of faith and went with something very basic a QP with just some added text and a play with brushes. I haven't as yet caught up with all the latest release notes but it sure looks a beauty so far.
Find the release notes here http://gimp.org/release-notes/gimp-2.6.html and the latest download here http://gimp-win.sourceforge.net/stable.html. Thanks Nikkiana...

Credits: Automnal Sweetness QP by Choukette